I bumped into this whilst playing with Out of Band Management in ConfigMgr2007 SP1. My vPro machine just couldn't get provisioned by my ConfigMgr server. I was reading through the logs and the provisioning task failed once and did not resume even I ran the Refresh Machine Policy from my client.
Then my good friend from Intel Paul Haines and Ow Haw Kuang shared with me that the auto-provisioning only executes every 24 hours but then you can still trigger it manually using WMI to force the provisioning task.
This topic is covered in the following link:
http://communities.intel.com/community/openportit/vproexpert/microsoft-vpro/blog/2008/10/01/using-wmi-to-force-the-sccm-agent-to-check-for-its-amt-auto-provisioning-policy
I did the simple method of copying the following code into a vbs file and running it from the client machine and it works !
Option Explicit
Main
Sub Main()
Dim oLocator
Set oLocator = CreateObject("WbemScripting.SWbemLocator")
Dim oServices
Set oServices = oLocator.ConnectServer( , "root\ccm\policy\machine\actualconfig")
Dim oObjectSet
Set oObjectSet = oServices.InstancesOf("CCM_OutOfBandManagementSettings")
Dim oObject
For Each oObject In oObjectSet
Wscript.Echo "Name: " & oObject.AutoProvision
oObject.AutoProvision = False
oObject.Put_
WScript.Sleep 500
Wscript.Echo "Name: " & oObject.AutoProvision
oObject.AutoProvision = true
oObject.Put_
Next
End Sub
20 December 2008
07 December 2008
System Center Service Manager Beta 1 - Software Requirements
I got to say that the moment I looked through the Hardware and Software Requirement for Service Manager, I was pretty shocked at the Software Requirements. Everything is x64 !!!!! ... Nevertheless, I come to accept that the way to go is 64 bit and have no serious qualms on this.
Basically, in Service Manager we have 4 main components in it being:
Service Manager Management Server
Service Manager Console
CMDB and Data Warehouse
Basically, in Service Manager we have 4 main components in it being:
- Service Manager Management Server - Contains the main software component of a Service Manager installation. You can use the Management Server to manage incidents, changes, users and tasks
- Configuration Management Database (CMDB) - The database that containts the Service Manager Configuration Items (CI) information fron the IT Enterprise
- Service Manager Console - The UI component that is used by the analyst and the helpdesk administrator to perform Service Manager function such as incidents, change and tasks. This commponent is automatically installed on the Management Server. You can also install additional Service Manager Console on other computers
- Data Warehouse - (Optional) This is the server and the database that provides long term storage of business data to be used for reporting
Service Manager Management Server
- 64-bit edition of Windows Server 2008 Standard OR the 64-bit edition of Windows Server 2008 Enterprise
- Microsoft .NET Framework version 3.5 with SP1*
Service Manager Console
- 64-bit edition of Windows Server 2008 Standard or the 64-bit edition of Windows Server 2008 Enterprise
- 64-bit version of Windows Server 2003 Standard with SP1 or the 64-bit version of Windows Server 2003 Enterprise with SP1
- The 64-bit edition of Windows Vista
- Microsoft .NET Framework version 3.5 with SP1
CMDB and Data Warehouse
- The 64-bit edition of Windows Server 2008 Standard or the 64-bit edition of Windows Server 2008 Enterprise
- The 64-bit version of SQL Server 2008
- SSRS component of SQL Server 2008
03 December 2008
Check out KLM - Fill a Plane - Promote your plane
Hi,
I want you to take a look at : KLM - Fill a Plane - Promote your plane
22 November 2008
Creating Custom SCCM Reports using SQL Views
Bumped into this very interesting guide yesterday and I believe this would be an essential guide for those who are looking into creating custom reports for SCCM. The one I like the most is there documentation of the SCCM DB Schema altogether. Well not I can't see it from SQL Server, but now we have a documented description of the Database Schema altogether.
Interested? Get it from this link
http://www.microsoft.com/downloads/details.aspx?FamilyId=87BBE64E-5439-4FC8-BECC-DEB372A40F4A&displaylang=en
OR you can get it from my SkyDrive in case that link no longer valid.
http://cid-8b468d6e5c4e0782.skydrive.live.com/self.aspx/Public/CreatingCustomReportsByUsingSQLViews.msi
01 November 2008
SNMP Simulator that you can use to Demo monitoring of network devices. using OpsMgr2007
One of the biggest challenge for us to demo performance monitoring of network devices to our clients would be the fact that we do not have a network device available during the demo session.
Jalasoft which offers the ability to extend OpsMgr capabilities in monitoring of network devices through it's Xian IO Network Manager has come out with a FREE SNMP simulation tool called Jalasoft SNMP Device Simulator v2.6. It has a user friendly user interface and allows you to simulate

For more information and where to download this free tool, go to this link:
http://www.jalasoft.com/Web/Product/Product.aspx?id=49
Jalasoft which offers the ability to extend OpsMgr capabilities in monitoring of network devices through it's Xian IO Network Manager has come out with a FREE SNMP simulation tool called Jalasoft SNMP Device Simulator v2.6. It has a user friendly user interface and allows you to simulate
- Cisco Switches
- Cisco Router
- Cisco Firewalls
- Cisco VPN Concentrators
- Cisco Wireless devices
- 3Com Switches
- HP Procurve Switches
- F5 BigIp
- Nortel
- APC UPS

For more information and where to download this free tool, go to this link:
http://www.jalasoft.com/Web/Product/Product.aspx?id=49
14 October 2008
Recomended Anti Virus Exclusion for OpsMgr
This topic might evade aloft of us until we encounter an environment which has strong security policies.
I bumped through this blog entry from one of Rod Trent 's entry and I find it extremely helpful one as well
In Summary what we need to consider would be:
i) OpsMgr Server
“\Program Files\System Center Operations Manager\…\Health Service State” and all sub-directories
“%windir\temp%‟ or other directory depends on the directory store for the ETL files (defined in
starttracing.cmd)
ii) Monitored Server
“\Program Files\System Center Operations Manager\…\Health Service State” and all sub-directories
“%windir\temp%‟ or other directory depends on the directory store for the ETL files (defined in
starttracing.cmd)
iii) DB Server
File path which stores the OpsMgr DB, DW and if applicable ACS DB
iv) OpsMgr Console
\Documents and Settings\\Local Settings\…\Microsoft.MOM.UI.Console
v) Others
%installdir%\Health Service State
%installdir%\Config Service State
%installdir%\SDK Service State
%installdir%\tools\tmf
%windir%\temp\OpsMgrTrace
You will also need to consider to exclude the process of monitoringhost.exe
As for file type exclusion, you will need to consider EDB, CHK and LOG filetypes
I bumped through this blog entry from one of Rod Trent 's entry and I find it extremely helpful one as well
In Summary what we need to consider would be:
i) OpsMgr Server
“\Program Files\System Center Operations Manager\…\Health Service State” and all sub-directories
“%windir\temp%‟ or other directory depends on the directory store for the ETL files (defined in
starttracing.cmd)
ii) Monitored Server
“\Program Files\System Center Operations Manager\…\Health Service State” and all sub-directories
“%windir\temp%‟ or other directory depends on the directory store for the ETL files (defined in
starttracing.cmd)
iii) DB Server
File path which stores the OpsMgr DB, DW and if applicable ACS DB
iv) OpsMgr Console
\Documents and Settings\
v) Others
%installdir%\Health Service State
%installdir%\Config Service State
%installdir%\SDK Service State
%installdir%\tools\tmf
%windir%\temp\OpsMgrTrace
You will also need to consider to exclude the process of monitoringhost.exe
As for file type exclusion, you will need to consider EDB, CHK and LOG filetypes
17 September 2008
Installation of SQL Server took a very long time
Whilst installing SQL Server 2005 for our customer, it got stucked in when the installer is in the Setting File Security of the Configure Database Service step of the installation. Tried checking through the event logs but no errors were recorded.
I opened the installation log file and looks like the installation got stucked in the Write_sqlFileSDDL action.
A quick search over the internet eventually lead me to http://support.microsoft.com/kb/910070
CAUSE: If the Domain has alot of external trusts with other domains the time required to lookup through the domain group names increased significantly. Therefore installation time will increase as well.
RESOLUTION: Though you can request for the download of the hotfix, I took the workaround METHOD by disabling the network and kickstart the installation. Worked well without any problems.
11 September 2008
TIPS: How to test CPU Performance in OpsMgr?
Whilst OpsMgr provides the ability to monitor CPU usage and create alerts should the CPU utilization surpassed the threshold set within the monitors. But how do you test CPU utilization? How do we get the CPU's of our servers to hit 100% so that OpsMgr would be able to detect it?
I found a blog entry which shares with us on how to do it ... using our good old friend Calculator.exe.
i) Launch Calculator
ii) Set your calculator to Scientific
iii) Type 123456789
iv) Press the n! button
You shall see that your CPU utilization spiked up to 100% immediately.
You can get the actual entry of the reference blog enter via this link
http://systemcenterguide.com/2007/11/26/tip-spike-cpu-for-testing-and-demonstrating-opsmgr/
02 September 2008
Installing Active Directory Management Pack Helper
Recently in one of our POC, we had problems installing agent a DC over a different site. A quick check on the physical server eventually found out that firewall is blocking the key ports thus communication could not be established. But then its a total different thing altogether.
We manually installed the agent from the DC and after approving it from OpsMgr console, the DC eventually got in as a Agent Managed Server. But hey wait a minute, how come the DC is not discovered with AD Role ???
The administrator insists that this is a DC.
Luckily Ray gave us a hint that it might be caused by AD Helper. We quickly went to the DC and check whether AD Helper is installed (though we should expect it to be installed automatically).
Apparently Active Directory Management Pack Helper is not installed and not available in Add/Remove Programs. So we need to install it manually, we need to go to the installation directory of the agent in the DC,
e.g. C:\Program Files\System Center Operations Manager 2007\HelperObjects
Launch OOMADS.msi and installation kicks in. Go to Add/Remove Programs to validate that the Active Directory Management Pack Helper is installed. Wait for a moment and voila' the DC will now have AD Role in OpsMgr console !
Installation of OpsMgr Console via commandline
Not many people would like it this way because they prefer Wizard like User Interface but then just to share out this in case if anyone would be interested.
To install OpsMgr Console via Commandline, the command would be:
msiexec.exe /i \\path\Directory\MOM.msi /qn /l*v \logs\MOMUI_install.log
ADDLOCAL=MOMUI USE_SETTINGS_FROM_AD=0 MANAGEMENT_GROUP=
ROOT_MANAGEMENT_SERVER_DNS=
Enjoy ...
To install OpsMgr Console via Commandline, the command would be:
msiexec.exe /i \\path\Directory\MOM.msi /qn /l*v \logs\MOMUI_install.log
ADDLOCAL=MOMUI USE_SETTINGS_FROM_AD=0 MANAGEMENT_GROUP=
ROOT_MANAGEMENT_SERVER_DNS=
Enjoy ...
Installation: Please Insert Disk1 ? What Disk1 ???
Recently we had a OpsMgr POC. We encountered problems on the AD topology view, apparently the OpsMgr console hang when we try to launch the AD topology views. We tried repairing the console but the problem is still there. Then we did the BOLD step, remove the OpsMgr console and reinstall it again.
Uninstallation went well .. hahaha
But when we starts to reinstall OpsMgr console, DISASTER STRUCKS, we got prompted with a messagebox with the message of "Please Insert Disk1". Both of us looked at each other dumbfounded. What Disk1 ???!!! Cancelling the messagebox eventually rolls back the installation.
We tried again, and without any clue in our head we just did whatever came up to our head including YES including inserting SQL Server Disk1 AND Windows 2003 Disk as well. (That's how desperate we were !!!)
Searching thru the internet did not help much at all. So we basically knew we were very much on our own on this one.
Hey, wait a sec !!! What about our good old installation log !!! Let's open it up and give it a good look !!!
This time we found the following line in the installation log (and we hope that you hold your laughs ):
"Source is incorrect. Volume label should be DISK2 but is SCOM_SP1_EN_VL"
And guess what? Our installation CD volume label is SCOM_SP1_EN_VL. So what do we do next ? We just rename the source Volume Label to DISK2. Save it to ISO and mount again. Run the installation again (and on our knees praying hard to the GOD of POCs [and since its Ramadhan month] hopefully everything wents OK).
And so it works, looks like our prayers were answered after all. And so life goes on ...
PS: The topology view is still crashing. Now for another headache but at least the console is back again.
06 August 2008
Publishing 3rd party updates in SCCM
I am trying to build a demo image for managing security compliance using SCCM. Just when I am to publish my custom application update, I received an error. A check on the log files shows the following:
Publish: : Exception occured during publishing:
Verification of file signature failed for file: \\SCCMDEMO\UpdateServicesPackages\Synthetic Software Update 1_0_d047fc39-4d2e-4a65-a6cf-a098980d26c3\efb7fc95-b36f-481e-8e36-8f25bb4d4020_1.cab$$
Searched through the net and found that I missed some steps in configuring the Update Server on the certificates. Thought of sharing this one with those who encountered the same pain.
Here are the steps I have taken and it works fine after that:
http://technet.microsoft.com/en-us/library/bb531061.aspx
Publish: : Exception occured during publishing:
Verification of file signature failed for file: \\SCCMDEMO\UpdateServicesPackages\Synthetic Software Update 1_0_d047fc39-4d2e-4a65-a6cf-a098980d26c3\efb7fc95-b36f-481e-8e36-8f25bb4d4020_1.cab$$
Searched through the net and found that I missed some steps in configuring the Update Server on the certificates. Thought of sharing this one with those who encountered the same pain.
Here are the steps I have taken and it works fine after that:
-
Click Start, click Run, type MMC in the text box, and then click OK to open the Microsoft Management Console (MMC).
-
Click File, click Add/Remove Snap-in, click Add, click Certificates, click Add, select Computer account, and then click Next.
-
Select Another computer, type the name of the update server or click Browse to find the update server computer, click Finish, click Close, and then click OK.
-
Expand Certificates (update server name), expand WSUS, and then click Certificates.
-
In the results pane, right-click the desired certificate, click All Tasks, and then click Export.
-
In the Certificate Export Wizard, use the default settings to create an export file with the name and location specified in the wizard. This file must be available to the update server before proceeding to the next step.
-
Right-click Trusted Publishers, click All Tasks, and then click Import. Complete the Certificate Import Wizard using the exported file from step 6.
-
If a self-signed certificate is used, such as WSUS Publishers Self-signed, right-click Trusted Root Certification Authorities, click All Tasks, and then click Import. Complete the Certificate Import Wizard using the exported file from step 6.
http://technet.microsoft.com/en-us/library/bb531061.aspx
19 June 2008
Tool to Groom Reporting DataWarehouse
My previous article was very much focused on how to modify the database grooming settings for OpsMgr reporting database. I have taken this a step further by developing a small and simple tool that saves non-SQL Server administrators the time and effort to do so. Basically this tool will connect to the tables that defines the grooming settings and retrieves the information and display them to a UI. User can then modify the grooming settings by setting the MaxDataAgeDays value in the table and save it.

For those who are interested in this tool can just email me at theankeong@gmail.com

For those who are interested in this tool can just email me at theankeong@gmail.com
03 June 2008
OpsMgr: Grooming Reporting Database
Whilst Database Grooming settings for Operations Manager DB is rather straight forward and can be done directly from the OpsMgr console, Grooming of Reporting Data Warehouse needs some additional configuration.
By default, the retention period for data being stored within Reporting Data Warehouse are:
To modify the grooming settings for Alerts data in OpsMgr Reporting Data Warehouse:
By default, the retention period for data being stored within Reporting Data Warehouse are:
| Data Set | Aggregation Type | Retention Period (Days) |
| Alert | Raw data | 400 |
| State | Raw data | 180 |
| State | Hourly aggregations | 400 |
| State | Daily aggregations | 400 |
| Event | Raw data | 100 |
| Aem | Raw data | 30 |
| Aem | Daily aggregations | 400 |
| Perf | Raw data | 10 |
| Perf | Hourly aggregations | 400 |
| Perf | Daily aggregations | 400 |
To modify the grooming settings for Alerts data in OpsMgr Reporting Data Warehouse:
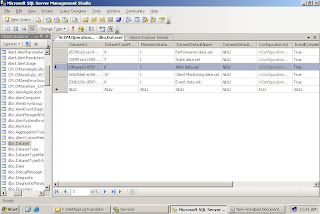
- Login to SQL Server Management Studio and connect to the SQL Server Instance that hosts your Reporting Data Warehouse
- Expand the Databases -> OperationsManagerDW -> Tables node
- Right click dbo.DataSet and select Open Table
- On the returned result, locate the dataset that you would want to modify by referring to the value in DataSetDefaultName field in this case it will be "Alert dataset" and get the DataSetId field for that particular row which in this case will be "69baaa10-055f-4f56-9a03-4312dd2b6406" as depicted in the picture below.

- Right click on dbo.StandardDatasetAggregation and click Open
- In the returned results, locate the row which has the DataSetId value that matches the one you got earlier which in this example will be "69baaa10-055f-4f56-9a03-4312dd2b6406"

- You can change the retention period of alert data by setting the value of MaxDataAgeDays field of the corresponding row
24 May 2008
Reinstall OpsMgr SP1 Reporting Server - Part II
This post is actually an extension of what I want to share on my previous posting on Reinstall OpsMgr SP1 Reporting Server. The scenario which I am going to share on this post is to reinstall OpsMgr SP1 Reporting Server WITHOUT reinstalling SQL Server Reporting Services (SSRS). The steps are pretty similar with what I have shared in my earlier post but there are few steps needs to be done before we can reinstall OpsMgr SP1 Reporting Server.
- Open OpsMgr Console, export Default Management Pack
- Edit the exported xml file to remove reference to Microsoft.Datawarehouse.Internal and also any Overrides as well
- Remove the Default Management Pack
- Remove the Microsoft.Datawarehouse.Internal MP and also Microsoft ODR MP
- Re-import the Default Management Pack from the xml file that you have edited earlier
- Remove Reporting Server via Add/Remove Programs
- Run ResetSRS tool (this tool is available in your Installation CD\Support Tools) to reset
- Run it via Command Prompt: ResetSRS
- Reconfigure SSRS by going to Reporting Services Configuration Tool. Click on Web Service Identity (which should yield an error symbol) and Click Apply.
- Reinstall OpsMgr SP1 Reporting Server
- Add OpsMgr SDK account as a member of Windows Authorization Access Group.
- Wait for a while ( 20 minutes ) and the reports will start to list one by one
15 May 2008
Reinstall OpsMgr SP1 Reporting Server
I came to learn it the hard way of not toying with IIS configuration. What started with just running a simple command to switch IIS to run on Win32 Application pool eventually messed up my Reporting Server and even repairing of Reporting Server SP1 couldn't do the trick. Frantic search over the internet didn't help much and so I am left with no choice but to reinstall Reporting Server. Installation went well but then reports can't be generated and so looks like reinstalling of SQL Server Reporting Services (SSRS) is my only choice now. This is what I did along the way on my OpsMgr server;
- Open OpsMgr Console, export Default Management Pack
- Edit the exported xml file to remove reference to Microsoft.Datawarehouse.Internal and also any Overrides as well
- Remove the Default Management Pack
- Remove the Microsoft.Datawarehouse.Internal MP and also Microsoft ODR MP
- Re-import the Default Management Pack from the xml file that you have edited earlier
- Remove Reporting Server via Add/Remove Programs
- Remove SSRS via Add/Remove Programs
- Remove the necessary Application Pools within IIS (Report Manager and Report Server)
- Log on to SQL Server Management Studio and Remove the following Database
- OperationManagerDW
- ReportServer
- ReportServerTempDB
- Install SSRS and Upgrade to SP2
- Run Reporting Service Config Tool and ensure that you have configured
- SSRS Virtual Directory
- Reporting Server DB
- Encryption Keys
- Web Service
- Install OpsMgr Reporting SP1
- Wait a second, how come the reports list doesn't flow in ? For this, I did something extra. I went to my DC to add my SDK account as a member of Windows Authorization Access Group group.
- Wait for a while ( 20 minutes ) and the reports will start to list one by one
- Give the reports a few tests and that should do the trick.
Subscribe to:
Posts (Atom)